Leveraging Exoscale Nested Virtualization Using Multipass
 Luc Juggery
Over the last few years, I delivered many Kubernetes trainings, some of which were preparations for the Certified Kubernetes Administrator (CKA) certification. This certification goes beyond the main concepts of Kubernetes and requires knowing how to create/manage/update and troubleshoot a kubeadm cluster.
In this article, we’ll use the creation of a kubeadm cluster as a pretext to explore Multipass, a tool from Canonical, to leverage the nested virtualization capabilities offered by Exoscale instances.
For our simple test cluster, we’ll use one controlplane node and two worker nodes. We could spin up three VMs, one for each node. Still, to avoid creating security groups, a private network, etc., we’ll use a single virtual machine and its nested virtualization capability to launch the controlplane and the worker nodes inside this one.
The picture below illustrates the cluster we want to create in a single Exoscale VM.
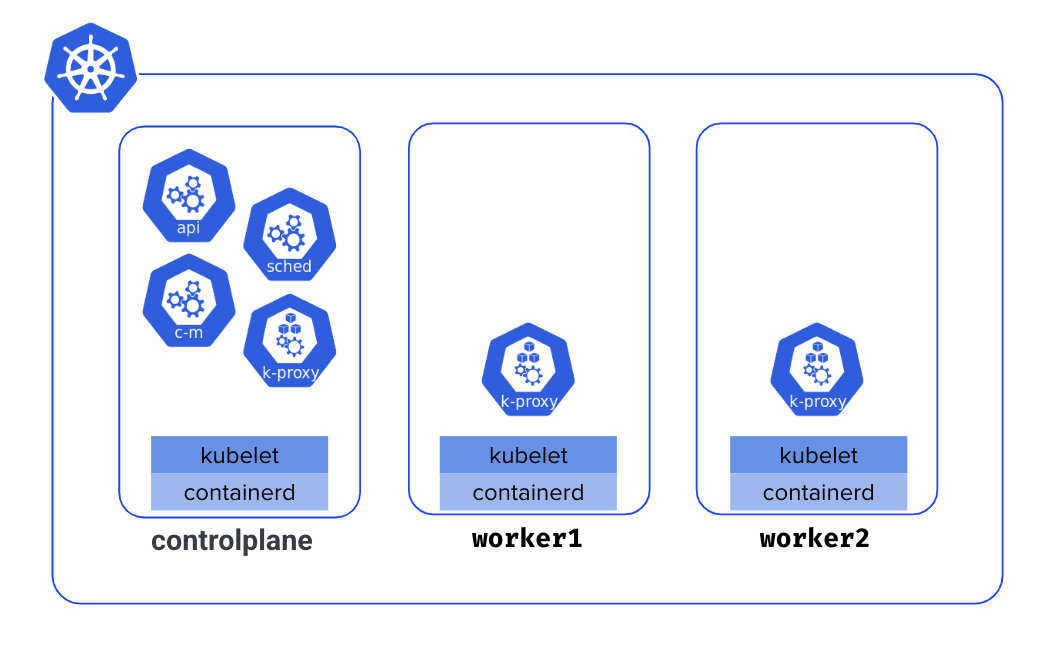
!!! note Nested virtualization is a useful feature that is available on Exoscale instances. It works well and is very convenient for demos and tests. However, it must not be used for production, as it is not officially supported.
Let’s follow the process step by step.
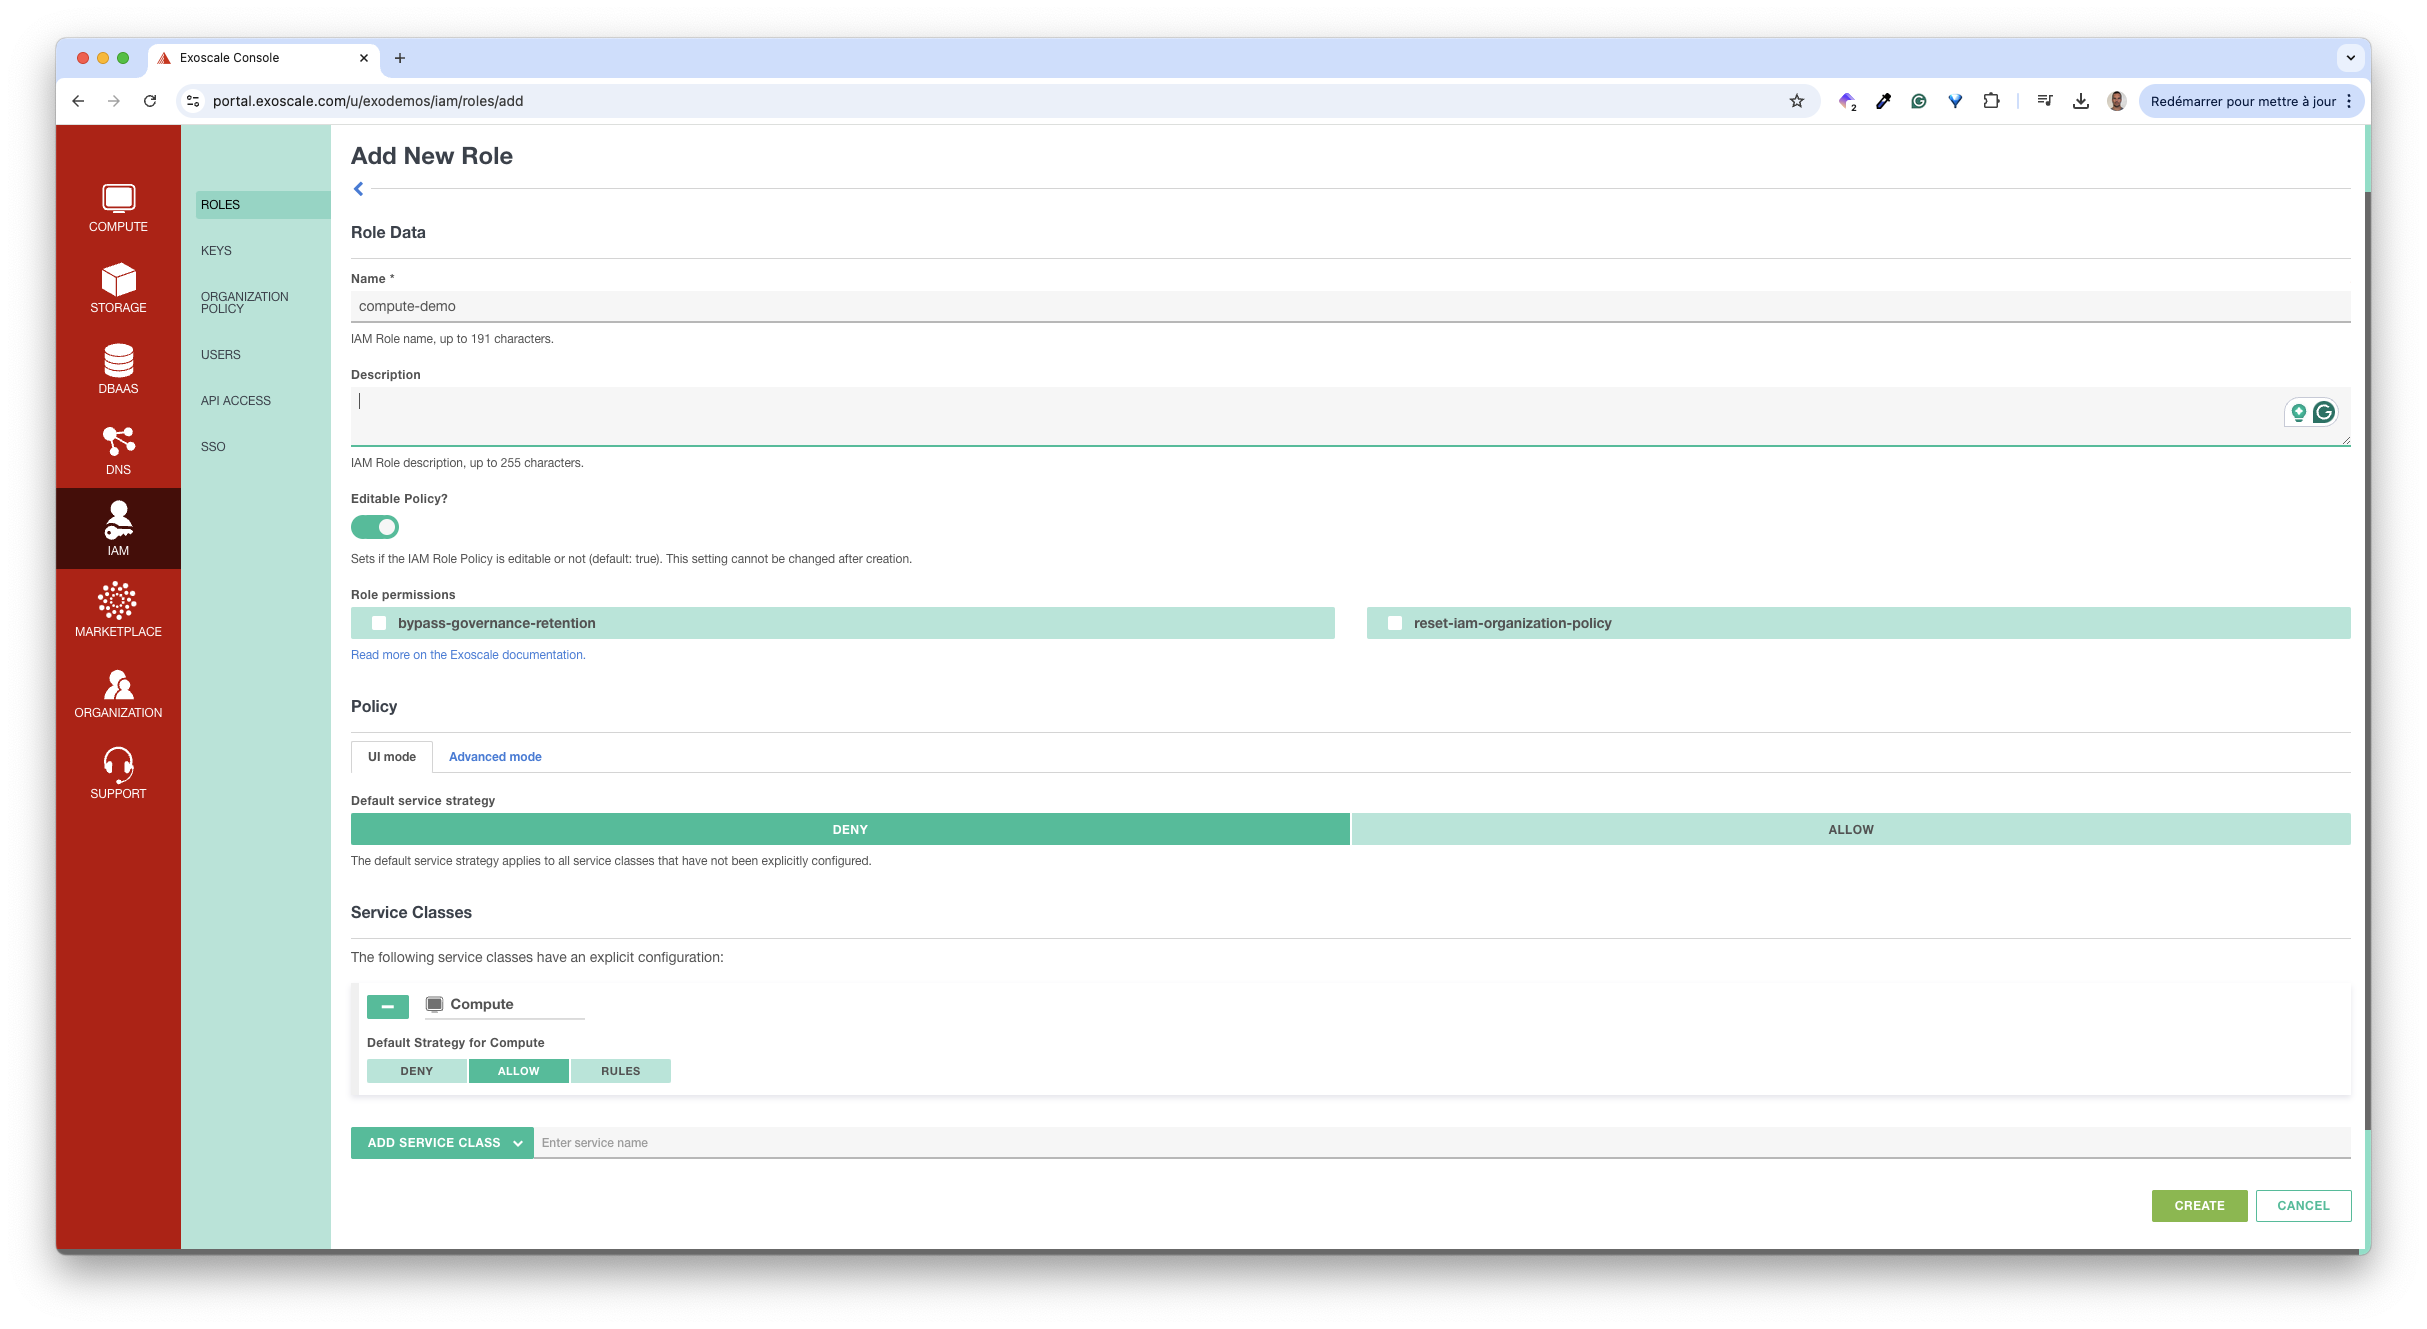
Creating an API Key
We’ll create an API key because we’ll use Exoscale’s exo binary to manage the host VM.
First, we create a role with access to the compute class. This class allows actions like creating VMs.
Next, we create an API Key associated with that role.
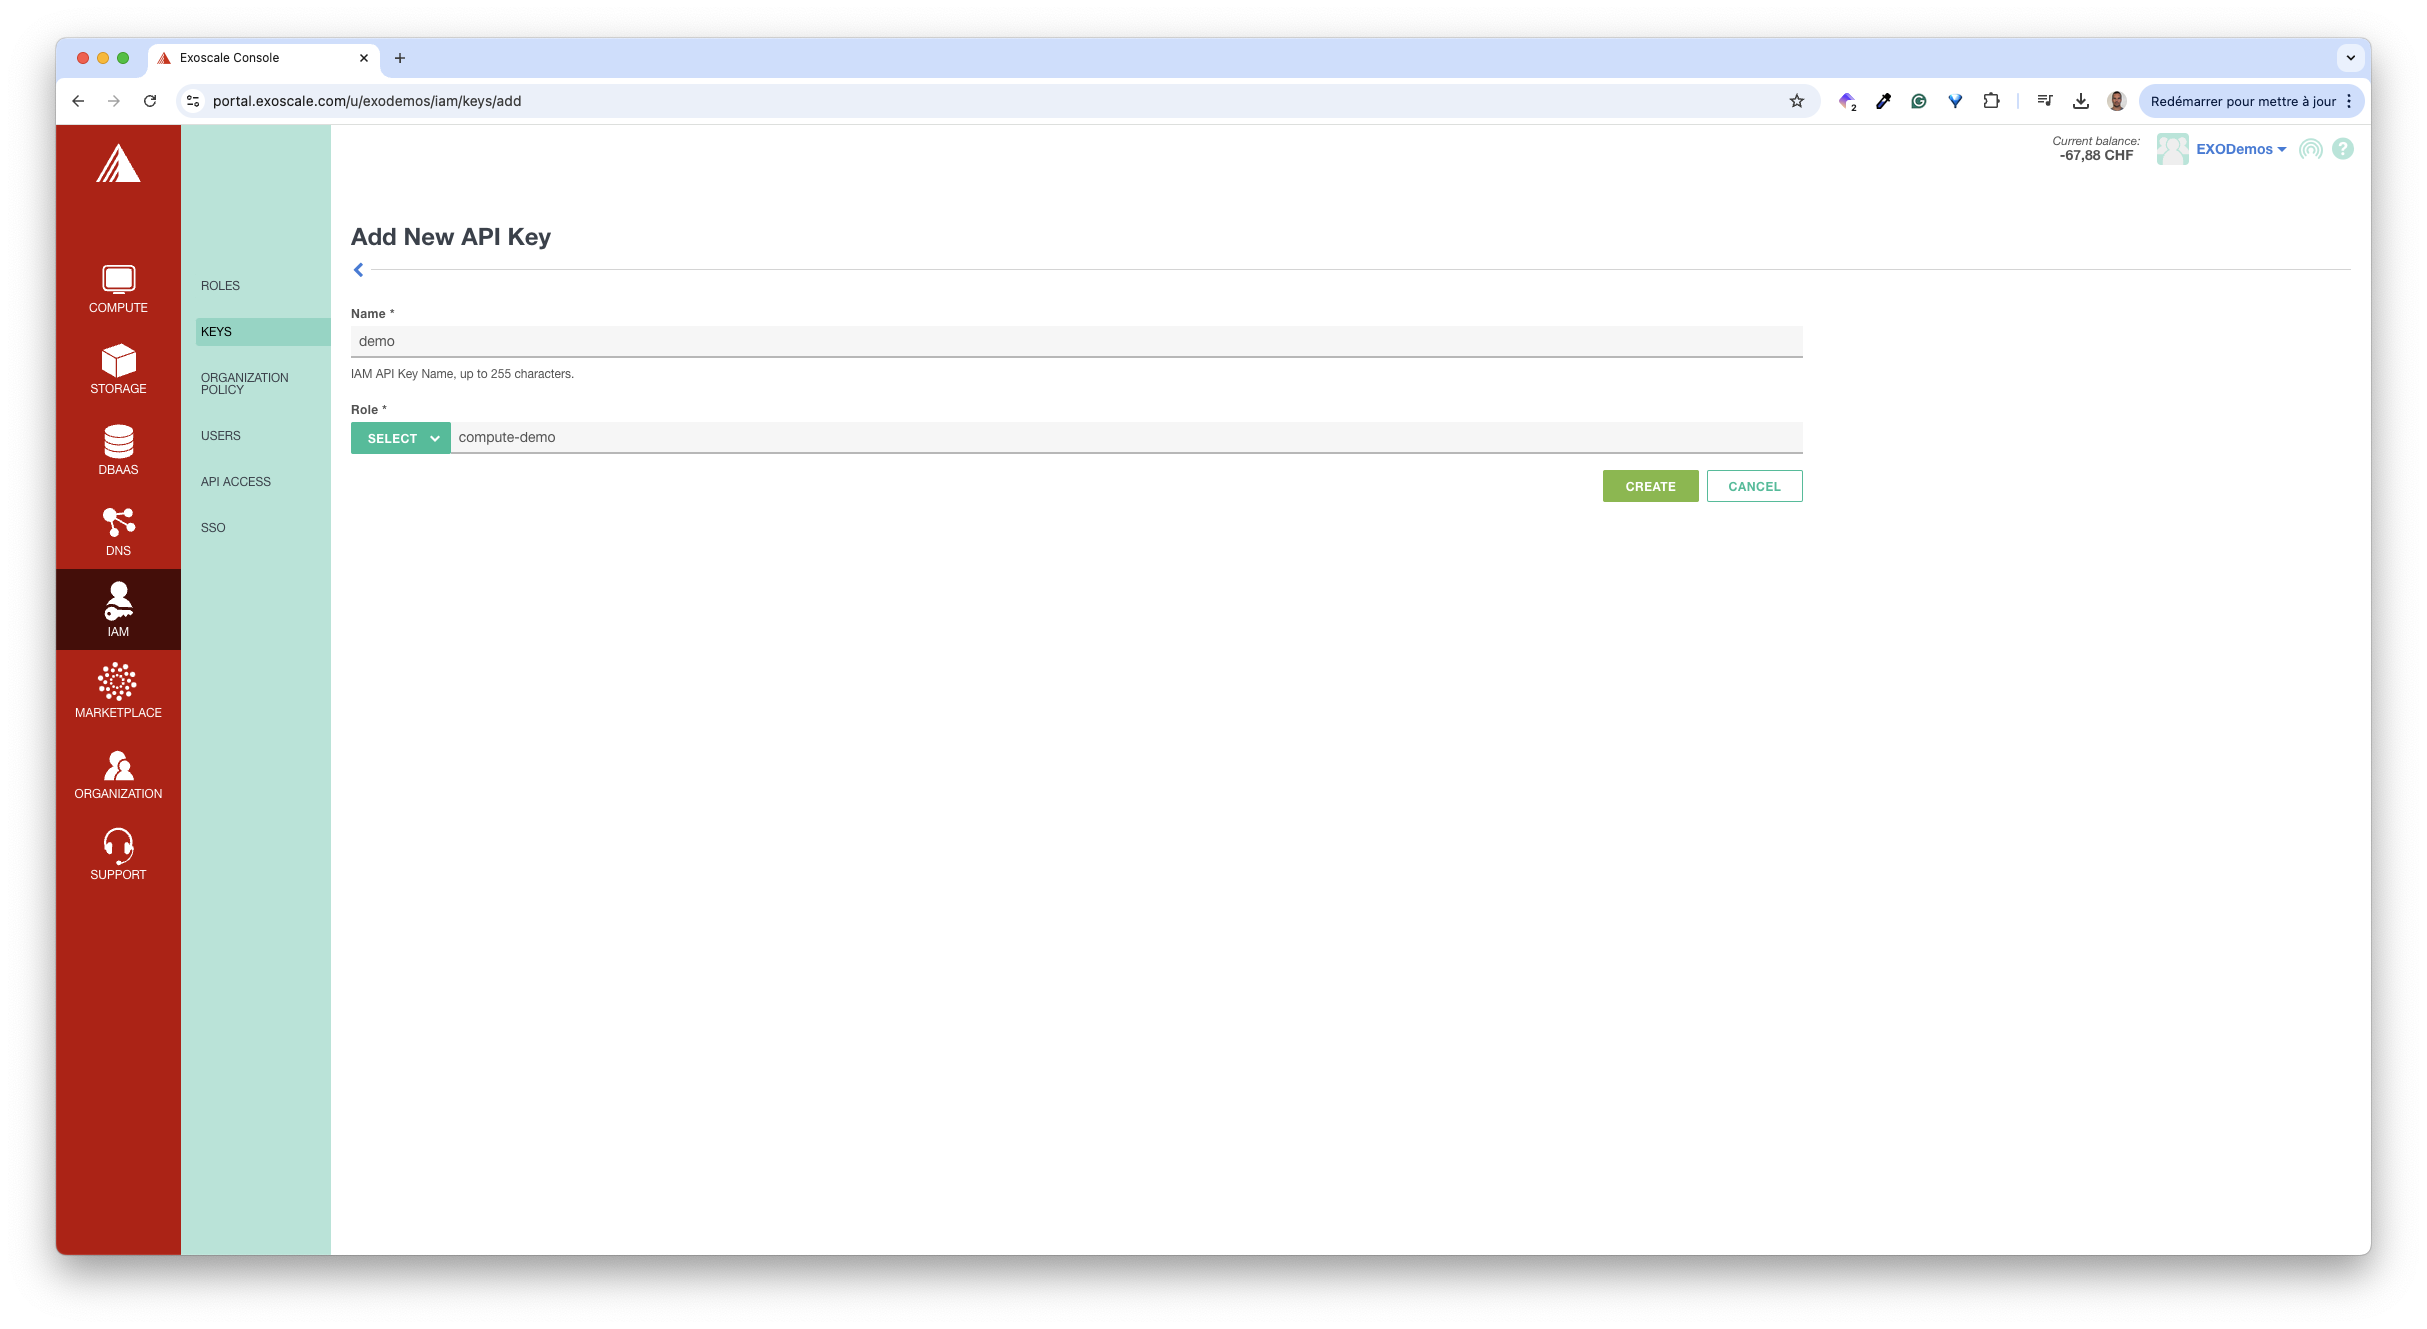
It returns both API Key and API Secret.
We save these items in the following environment variable to configure the exo CLI.
export EXOSCALE_API_KEY="EXO8aad101aa289b5e3c6b57604"
export EXOSCALE_API_SECRET="axbQR-xZuM4kq155jd7yuU0MqItovwDctJqSScdYNLs"
!!! note The API Keys above are temporary; we will delete them at the end of this example.
Creating the host VM
Using the CLI, we create a VM of type Large.
exo compute instance create --instance-type large demo!!! note
The above command can be simplified as follows exo c i add --instance-type large demo
It only takes a few seconds to create the VM.
 ✔ Creating instance "demo"... 15s
┼──────────────────────┼──────────────────────────────────────┼
│   COMPUTE INSTANCE   │                                      │
┼──────────────────────┼──────────────────────────────────────┼
│ ID                   │ b85650d7-8e1f-4ff8-b415-e2f7e462e71f │
│ Name                 │ demo                                 │
│ Creation Date        │ 2025-03-05 10:59:53 +0000 UTC        │
│ Instance Type        │ standard.large                       │
│ Template             │ Linux Ubuntu 22.04 LTS 64-bit        │
│ Zone                 │ ch-dk-2                              │
│ Anti-Affinity Groups │ n/a                                  │
│ Deploy Target        │ -                                    │
│ Security Groups      │ default                              │
│ Private Instance     │ No                                   │
│ Private Networks     │ n/a                                  │
│ Elastic IPs          │ n/a                                  │
│ IP Address           │ 91.92.155.79                         │
│ IPv6 Address         │ -                                    │
│ SSH Key              │ -                                    │
│ Disk Size            │ 50 GiB                               │
│ State                │ running                              │
│ Labels               │ n/a                                  │
│ Reverse DNS          │                                      │
┼──────────────────────┼──────────────────────────────────────┼
Creating nested VMs
As we did not provide any keys to configure SSH access to this VM, exo automatically created a local one for us (a helpful feature). We can then directly SSH into the VM.
$ exo c i ssh demo

The authenticity of host '91.92.155.79 (91.92.155.79)' can't be established.
ED25519 key fingerprint is SHA256:i9TIARsaOLN4G/O4LTPj87ugR4zCN5+he9LdNKQI3eU.
This key is not known by any other names.
Are you sure you want to continue connecting (yes/no/[fingerprint])? yes
Warning: Permanently added '91.92.155.79' (ED25519) to the list of known hosts.
Welcome to Ubuntu 22.04.5 LTS (GNU/Linux 5.15.0-130-generic x86_64)

 * Documentation:  https://help.ubuntu.com
 * Management:     https://landscape.canonical.com
 * Support:        https://ubuntu.com/pro

 System information as of Wed Mar  5 11:01:07 UTC 2025

  System load:  0.15              Processes:             124
  Usage of /:   3.5% of 48.27GB   Users logged in:       0
  Memory usage: 2%                IPv4 address for eth0: 91.92.155.79
  Swap usage:   0%

Expanded Security Maintenance for Applications is not enabled.

0 updates can be applied immediately.

Enable ESM Apps to receive additional future security updates.
See https://ubuntu.com/esm or run: sudo pro status


The list of available updates is more than a week old.
To check for new updates run: sudo apt update

ubuntu@demo:~$
Next, we install Multipass in the VM.
sudo snap install multipassRunning the multipass binary without any options/commands returns the list of the available commands. In this example, we’ll only use a couple of them.
$ multipass

Usage: multipass [options] <command>
Create, control and connect to Ubuntu instances.

This is a command line utility for multipass, a
service that manages Ubuntu instances.

Options:
  -h, --help     Displays help on commandline options
  -v, --verbose  Increase logging verbosity. Repeat the 'v' in the short option
                 for more detail. Maximum verbosity is obtained with 4 (or more)
                 v's, i.e. -vvvv.

Available commands:
  alias         Create an alias
  aliases       List available aliases
  authenticate  Authenticate client
  clone         Clone an instance
  delete        Delete instances and snapshots
  exec          Run a command on an instance
  find          Display available images to create instances from
  get           Get a configuration setting
  help          Display help about a command
  info          Display information about instances or snapshots
  launch        Create and start an Ubuntu instance
  list          List all available instances or snapshots
  mount         Mount a local directory in the instance
  networks      List available network interfaces
  prefer        Switch the current alias context
  purge         Purge all deleted instances permanently
  recover       Recover deleted instances
  restart       Restart instances
  restore       Restore an instance from a snapshot
  set           Set a configuration setting
  shell         Open a shell on an instance
  snapshot      Take a snapshot of an instance
  start         Start instances
  stop          Stop running instances
  suspend       Suspend running instances
  transfer      Transfer files between the host and instances
  umount        Unmount a directory from an instance
  unalias       Remove aliases
  version       Show version details
We want a cluster composed of one controlplane node and two worker nodes, so we create these three VMs as follows.
for name in controlplane worker1 worker2; do
  multipass launch -n $name --cpus 2 --memory 2G --disk 1OG
done
!!! note By default, Multipass creates a VM with 1vcpu, 1G RAM, and 5G of disk. We launched our VMs with 2vcpu, 2G RAM, and 10G of disk to meet the kubeadm prerequisites.
It only requires a few minutes to create the VMs.
Launched: controlplane
Launched: worker1
Launched: worker2
We can verify the list of VMs as follows.
$ multipass list
Name                    State             IPv4             Image
controlplane            Running           10.95.137.134    Ubuntu 24.04 LTS
worker1                 Running           10.95.137.149    Ubuntu 24.04 LTS
worker2                 Running           10.95.137.71     Ubuntu 24.04 LTS
Multipass provides detailed information on a specific VM, as illustrated below for the controlplane.
$ multipass info controlplane
Name:           controlplane
State:          Running
Snapshots:      0
IPv4:           10.95.137.134
Release:        Ubuntu 24.04.2 LTS
Image hash:     a3aea891c930 (Ubuntu 24.04 LTS)
CPU(s):         2
Load:           0.03 0.18 0.09
Disk usage:     1.9GiB out of 9.6GiB
Memory usage:   318.4MiB out of 1.9GiB
Mounts:         --
We now have 3 VMs running inside the host VM. In the next part, we’ll use kubeadm to create a Kubernetes cluster on these VMs.
Creating a kubeadm cluster
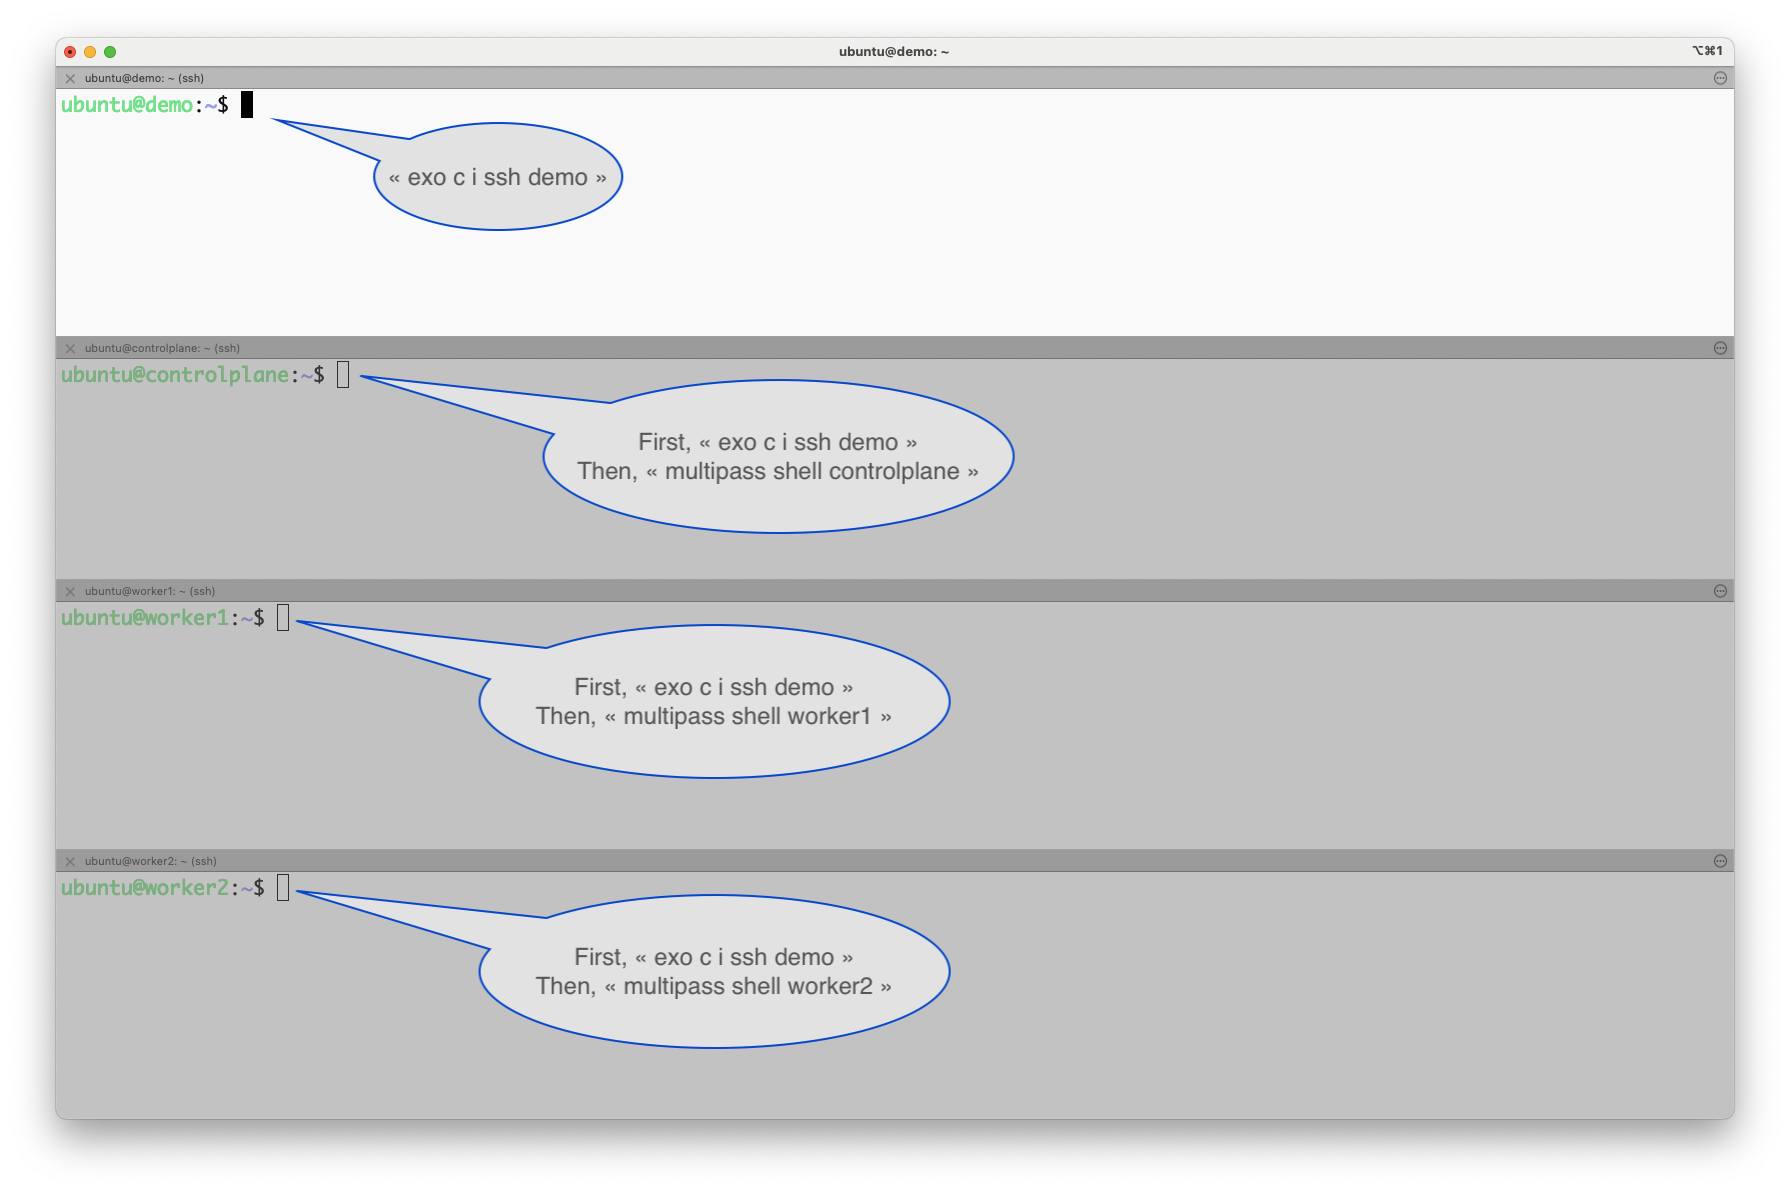
First, to simplify the creation step, we launch several terminals:
- the first in the host VM
- the second one in the controlplane VM
- the third one in the worker1 VM
- the fourth one in the worker2 VM
The screenshot below provides the commands needed for each terminal.
Next, to simplify the creation of the cluster, we run the following scripts to install the required packages (kubeadm, containerd, kubectl) and some dependencies in each nested VM.
we run
curl https://luc.run/kubeadm/controlplane.sh | shon controlplanewe run
curl https://luc.run/kubeadm/worker.sh | shon both worker1 and worker2
!!! note Feel free to check the content of these scripts before running them
Then, we initialize the cluster by running the following command on the controlplane.
sudo kubeadm initThis command shows all the initialization steps.
[init] Using Kubernetes version: v1.32.2
[preflight] Running pre-flight checks
[preflight] Pulling images required for setting up a Kubernetes cluster
[preflight] This might take a minute or two, depending on the speed of your internet connection
[preflight] You can also perform this action beforehand using 'kubeadm config images pull'
W0305 13:26:05.219242    5372 checks.go:846] detected that the sandbox image "registry.k8s.io/pause:3.8" of the container runtime is inconsistent with that used by kubeadm.It is recommended to use "registry.k8s.io/pause:3.10" as the CRI sandbox image.
[certs] Using certificateDir folder "/etc/kubernetes/pki"
[certs] Generating "ca" certificate and key
[certs] Generating "apiserver" certificate and key
[certs] apiserver serving cert is signed for DNS names [controlplane kubernetes kubernetes.default kubernetes.default.svc kubernetes.default.svc.cluster.local] and IPs [10.96.0.1 10.95.137.134]
[certs] Generating "apiserver-kubelet-client" certificate and key
[certs] Generating "front-proxy-ca" certificate and key
[certs] Generating "front-proxy-client" certificate and key
[certs] Generating "etcd/ca" certificate and key
[certs] Generating "etcd/server" certificate and key
[certs] etcd/server serving cert is signed for DNS names [controlplane localhost] and IPs [10.95.137.134 127.0.0.1 ::1]
[certs] Generating "etcd/peer" certificate and key
[certs] etcd/peer serving cert is signed for DNS names [controlplane localhost] and IPs [10.95.137.134 127.0.0.1 ::1]
[certs] Generating "etcd/healthcheck-client" certificate and key
[certs] Generating "apiserver-etcd-client" certificate and key
[certs] Generating "sa" key and public key
[kubeconfig] Using kubeconfig folder "/etc/kubernetes"
[kubeconfig] Writing "admin.conf" kubeconfig file
[kubeconfig] Writing "super-admin.conf" kubeconfig file
[kubeconfig] Writing "kubelet.conf" kubeconfig file
[kubeconfig] Writing "controller-manager.conf" kubeconfig file
[kubeconfig] Writing "scheduler.conf" kubeconfig file
[etcd] Creating static Pod manifest for local etcd in "/etc/kubernetes/manifests"
[control-plane] Using manifest folder "/etc/kubernetes/manifests"
[control-plane] Creating static Pod manifest for "kube-apiserver"
[control-plane] Creating static Pod manifest for "kube-controller-manager"
[control-plane] Creating static Pod manifest for "kube-scheduler"
[kubelet-start] Writing kubelet environment file with flags to file "/var/lib/kubelet/kubeadm-flags.env"
[kubelet-start] Writing kubelet configuration to file "/var/lib/kubelet/config.yaml"
[kubelet-start] Starting the kubelet
[wait-control-plane] Waiting for the kubelet to boot up the control plane as static Pods from directory "/etc/kubernetes/manifests"
[kubelet-check] Waiting for a healthy kubelet at http://127.0.0.1:10248/healthz. This can take up to 4m0s
[kubelet-check] The kubelet is healthy after 1.002287445s
[api-check] Waiting for a healthy API server. This can take up to 4m0s
[api-check] The API server is healthy after 8.00389607s
[upload-config] Storing the configuration used in ConfigMap "kubeadm-config" in the "kube-system" Namespace
[kubelet] Creating a ConfigMap "kubelet-config" in namespace kube-system with the configuration for the kubelets in the cluster
[upload-certs] Skipping phase. Please see --upload-certs
[mark-control-plane] Marking the node controlplane as control-plane by adding the labels: [node-role.kubernetes.io/control-plane node.kubernetes.io/exclude-from-external-load-balancers]
[mark-control-plane] Marking the node controlplane as control-plane by adding the taints [node-role.kubernetes.io/control-plane:NoSchedule]
[bootstrap-token] Using token: epeqlp.0g00lvkq5ibw44vd
[bootstrap-token] Configuring bootstrap tokens, cluster-info ConfigMap, RBAC Roles
[bootstrap-token] Configured RBAC rules to allow Node Bootstrap tokens to get nodes
[bootstrap-token] Configured RBAC rules to allow Node Bootstrap tokens to post CSRs in order for nodes to get long term certificate credentials
[bootstrap-token] Configured RBAC rules to allow the csrapprover controller automatically approve CSRs from a Node Bootstrap Token
[bootstrap-token] Configured RBAC rules to allow certificate rotation for all node client certificates in the cluster
[bootstrap-token] Creating the "cluster-info" ConfigMap in the "kube-public" namespace
[kubelet-finalize] Updating "/etc/kubernetes/kubelet.conf" to point to a rotatable kubelet client certificate and key
[addons] Applied essential addon: CoreDNS
[addons] Applied essential addon: kube-proxy

Your Kubernetes control-plane has initialized successfully!

To start using your cluster, you need to run the following as a regular user:

  mkdir -p $HOME/.kube
  sudo cp -i /etc/kubernetes/admin.conf $HOME/.kube/config
  sudo chown $(id -u):$(id -g) $HOME/.kube/config

Alternatively, if you are the root user, you can run:

  export KUBECONFIG=/etc/kubernetes/admin.conf

You should now deploy a pod network to the cluster.
Run "kubectl apply -f [podnetwork].yaml" with one of the options listed at:
  https://kubernetes.io/docs/concepts/cluster-administration/addons/

Then you can join any number of worker nodes by running the following on each as root:

kubeadm join 10.95.137.134:6443 --token epeqlp.0g00lvkq5ibw44vd \
	--discovery-token-ca-cert-hash sha256:9efa5199db13dc517812bb74cc62b6c7dd6ebc8206f2cef70bbda680b8dc479b
It also provides several commands to:
- retrieve the cluster kubeconfig file
- add nodes to the cluster
First, we copy the kubeconfig file, generated during the initialization process, into the account of the Ubuntu user.
mkdir -p $HOME/.kube
sudo cp -i /etc/kubernetes/admin.conf $HOME/.kube/config
sudo chown $(id -u):$(id -g) $HOME/.kube/config
This allows the local kubectl binary (installed on controlplane) to communicate with the cluster.
ubuntu@controlplane:~$ kubectl get node
NAME           STATUS     ROLES           AGE    VERSION
controlplane   NotReady   control-plane   5m5s   v1.32.2
Next, we add worker1 and worker2 as worker nodes to the cluster by running the following command on each.
sudo kubeadm join 10.95.137.134:6443 --token epeqlp.0g00lvkq5ibw44vd \
	--discovery-token-ca-cert-hash sha256:9efa5199db13dc517812bb74cc62b6c7dd6ebc8206f2cef70bbda680b8dc479b
Once completed, we again list the nodes from the controlplane and notice the cluster now has three nodes.
ubuntu@controlplane:~$ kubectl get node
NAME           STATUS     ROLES           AGE     VERSION
controlplane   NotReady   control-plane   5m57s   v1.32.2
worker1        NotReady   <none>          17s     v1.32.2
worker2        NotReady   <none>          10s     v1.32.2
The node’s status is NotReady as the cluster has no network plugin yet. Let’s run the following commands, still from the controlplane node, to install Cilium.
OS="$(uname | tr '[:upper:]' '[:lower:]')"
ARCH="$(uname -m | sed -e 's/x86_64/amd64/' -e 's/\(arm\)\(64\)\?.*/\1\2/' -e 's/aarch64$/arm64/')"
curl -L --remote-name-all https://github.com/cilium/cilium-cli/releases/latest/download/cilium-$OS-$ARCH.tar.gz{,.sha256sum}
sudo tar xzvfC cilium-$OS-$ARCH.tar.gz /usr/local/bin
cilium install
After a few tens of seconds, the cluster becomes fully functional, as illustrated below.
ubuntu@controlplane:~$ kubectl get node
NAME           STATUS   ROLES           AGE     VERSION
controlplane   Ready    control-plane   7m14s   v1.32.2
worker1        Ready    <none>          94s     v1.32.2
worker2        Ready    <none>          87s     v1.32.2
Accessing the cluster from the host machine
To access the cluster from the host machine, we first need to install kubectl on that one.
ubuntu@demo:~$ sudo snap install kubectl --classicNext, we retrieve the kubeconfig file from the controlplane node.
ubuntu@demo:~$ multipass transfer controlplane:/home/ubuntu/.kube/config kubeconfigThen, we copy it into the folder where kubectl picks its configuration by default.
ubuntu@demo:~$ cp kubeconfig $HOME/.kube/configWe can now access the cluster from the host VM.
ubuntu@demo:~$ kubectl get no
NAME           STATUS   ROLES           AGE   VERSION
controlplane   Ready    control-plane   22m   v1.32.2
worker1        Ready    <none>          16m   v1.32.2
worker2        Ready    <none>          16m   v1.32.2
We have created a three nodes kubeadm cluster on nested VMs running on our single Exoscale instance. Instead of creating private networks and security groups, we can manage everything inside the host VM. Should we need to recreate the cluster with another Kubernetes release, we only need to delete the nested VM and recreate new ones.
Cleanup
Deleting the cluster is straightforward as we need to remove the nested VMs.
for name in controlplane worker1 worker2; do
  multipass delete -p $name
done
Key takeaways
The content of this post is twofold. We detailed how to create a kubeadm Kubernetes cluster, which by itself is an important starting point if you want to better understand Kubernetes or planned to prepare for the CKA. For this purpose, we used Exoscale nested virtualization capabilities, which allowed us to deploy this cluster in VMs within our single host instance.

